Search
Installation of satellite TV
Advertising
Navigation
Main
Satellites
TV Package
HD Channels
Ultra HD Channels
BISS key
Coverage Maps
Sat Receivers
Installation of satellite TV
Satellite News
Contacts
Search
Installation of satellite TV
Advertising
Navigation
Setting up a satellite dish on 3 ABS-2 satellite (75E), Horizons-2 / IS 15 (85E), Yamal 401 (90E) |
One of the most popular systems, installation of satellite TV is the system of three satellites: ABS-1 (75E), Horizons-2 /IS 15 (85E), Yamal 401 (90E). With these satellites broadcast satellite television operators, such as the Rainbow TV, Continent TV, Gazprom Spice, Gazkom and others. The equipment of this system include: satellite, 2 additional plastic fasteners (Multifeed) or a homemade piece multifeed, 3 line converter (head) for the Ku-diappazon, suspension or fixed-mast for fixing the antenna DiSEqS (Diseko) -komutator heads HF - 75 Ohm cable and 6 F - connectors.
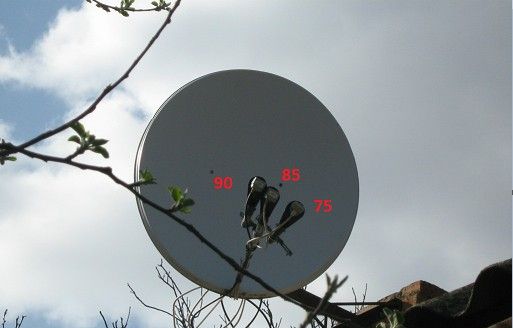 To receive the signal from the satellites is necessary to use universal linear polarization converters.
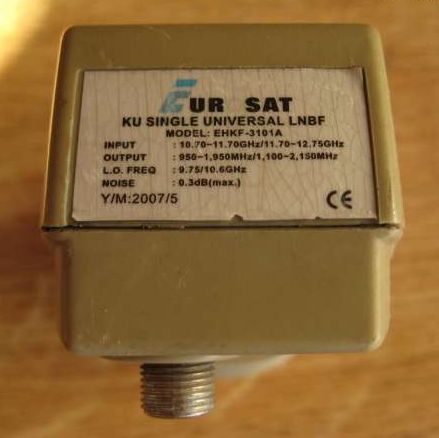 On the labels of these converters marked the main reception parameters: Frequency 10,70-11,70 GHz 11,70-12,75GGts; Promezhitochnaya frequency 950-1950 MHz and 1100- 2150 MHz; LO frequency: 10600 MHz and 9750 MHz; Noise level: 0.3 dB. The use of two oscillators caused by the fact that the Ku-band wide enough (2050 MHz), according to this Ku-band is divided into two sub-range of 10700-11700 and 11700-12750 MHz.
 Since the satellite dish is a mirror for the satellite signal, the signal is reflected from its surface and is collected in a bunch enters the converter. When installing the additional bits at the side multifeed reflected satellite signal from the right with respect to the central catch follows the left hand side, and the reflected signal from the satellite of the left to the right. Ie we have a central satellite Horizons-2 /IS 15 (85E) its we catch at the center of the antenna, satellite Yamal 201 /300K (90E) is to the right 85 degrees, so the signal from it should look to the left. ABS-2 satellite (75E) is located to the left of Horizons-2 /IS 15 (85E), so the signal 75 degrees, we will look to the right.
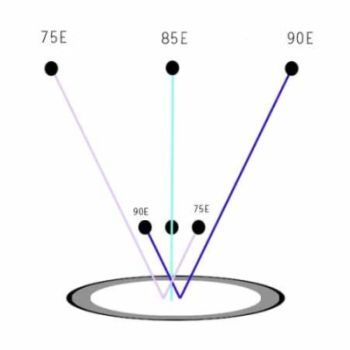 Preparatory work: Before installing a satellite dish it is necessary to collect and equip additional fixtures and convectors. Please fasten an arc to the mirror at the same time comply with all the geometric dimensions - by tightening bolts, and then install the bracket and mounting bracket (Multifeed) convectors. The first set mount convector ABS-2 (75E) - This attachment will be closer to the mirror antenna, a second set mount head Yamal 401 (90E) and the central axis is put on the third convector Horizons-2 /IS 15 (85E), baits their respective fasteners. - Cut 3 segment of the RF cable meter-long (possible) put on the ends of the cable F-connector and isolate the metal part, then fasten the cable length of 3 to switch DiSEqC. As we connect the cable in the last instance, after setting up the antenna, it is at this stage of their preparation, it is desirable to sign or mark. Positioning the antenna: The area where it will be ustanvlena our antenna should be free in the southwest naprvlenii (South-West) from trees, houses, stopped structures which may interfere with the signal from the satellite to the receiver plate. First of all necessary to find the direction to the satellite antenna and a satellite antenna tilt angle. The easiest way to do it using the «Satellite Antenna Alignment». This program will calculate the azimuth and elevation needed for installation and setup plates, on any available satellite that location Reception. After determining azimuth looking for him on the ground with the help of a compass. 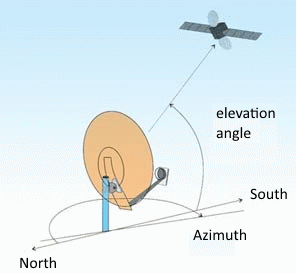 The program can help to mount the antenna on the sun, the sun calculate the time spent in the right napravlenii.V it indicates the time when the Sun becomes one line to the satellite, ie at a time when the sun replaces our companion. Well to do when there is no program and the direction of the satellite, we do not know? This is a long and difficult installation option. It consists in the search for any satellite transponder and scan already received channels using frequency tables to try to identify him. And then have to start from the location of known satellites.
Setting up a satellite dish: The first step is to set up a plate to a central satellite Horizons-2 /IS 15 (85E) and then tighten the screw rotation and angle plates, as in setting up the antenna on the ABS-1 satellite (75E) and Yamal 201 /300K (90E), they are not involved. With the help of a piece of cable connect the receiver to a central converter Horizons-2 /IS 15 (85E), and set up our satellite dish on the Horizons-2 /IS 15. To configure the most convenient to prepare in advance for the equipment setup satellite dishes: we will use a satellite receiver with prepared transponder frequency and connected portable TV.
Table. ¹1. Parameters for setting the transponder satellite dish:
1. Select mode "Antenna Setup" menu of the receiver, in the "Manual search" establish IS 15 satellite (85E), the satellite choose transponder- 11720 H horizontally polarized, 28800- flow rate correction oshibok- cars, these data are shown in Table 1. Search companion must be performed on the strongest transponder, and then fine-tune the lead transponder with a weak signal, while achieving maximum value signal. 2. orient the antenna at the expected location of the satellite can be determined by using a compass and or adjacent antennas mood at 85 degrees. This is a very important stage of adjustment, and if you choose the wrong direction can be long and painful adjustment carry with antenna does not produce the desired results. 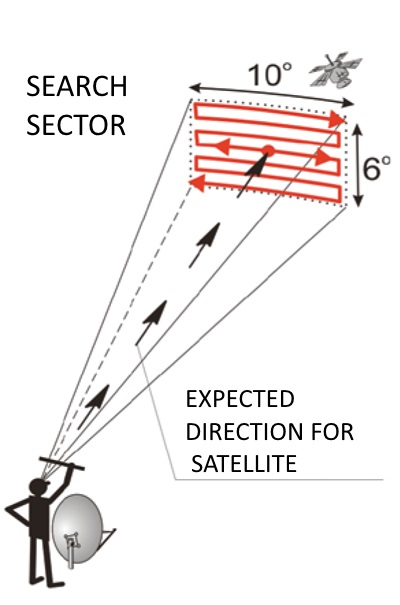 3. Once you have made sure that the direction is right and the angle of inclination is in the middle position must be smoothly and slowly rotate the antenna in a horizontal direction for a signal for controlling quality scale, in one direction, and if the scale does not respond, then later in the another. After the first pass is necessary to slightly change the angle of the top-down, start again the movement in the horizontal plane and thus several times until the signal. When you manage to catch at least some sort of signal, you must stop and light small movements up and down, left and right, to achieve the maximum signal level on the scale. After rigidly fix the mounting screws tilt and rotation angle of the plate. Then proceed to fine-tune the converter to this a little bit to rotate it in the holder, you can also move it a little bit along the holder back and forth, while to achieve maximum reading on the scale QUALITY.
 We must make sure that the antenna is tuned to the satellite, which we have set it, not on what else. To do this, we scan the transponders from Table 1 , and will include some sort of feed from the table. If the channels are not scanned or do not show, then set up the antenna to another satellite, and the setting should be repeated. When everything is done, you need to hold all the adjusting screws.
 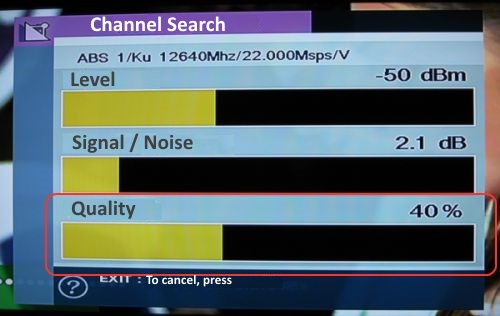 4. Configure the remaining 2 satellite (ABS-1 and Yamal 201 /300K) is to find a position relative to the central converter. It should move in all planes of focus with respect to the plates: up, down, left, right, forward, backward. To adjust the ABS-1 satellite, you must connect the cable to the convector ABS-1, and in the menu of the receiver must set the parameters of the satellite and the signal from the table. We do the same thing with convector Yamal. After all the manipulations, it is necessary once again to make sure the settings are correct all the satellites, once again check the tightness of all the elements of the antenna. Now you can connect the DiSEqC (Diseko) with the help of trained and designated sections of the cable to the corresponding convector. Unforgettable in a receiver to set the port numbers for each satellite.
| ||||||||||||||||||||||||||||||||||||