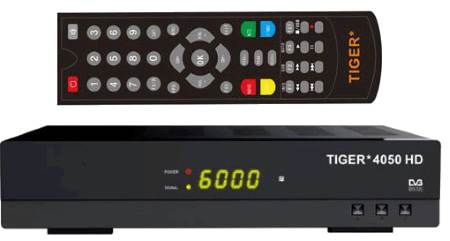
Characteristics of Tiger 4050 HD:
• Compact housing 220x40x145 mm
• The motherboard is equipped with a processor 3510 Ali, memory 4MB flash EON, MB of DDR2 512 memory.
• USB 2.0 connector with support for Wi-Fi USB adapter.
• HDMI quality.
• Supports TV picture resolution up to: 1080i-50Hz, 1080i-60Hz, 1080P-50Hz, 1080P-60 Hz .
• Support satellite standard: DVB-S/DVB-S2 (MPEG-2/MPEG-4/H.264) .
• Emergency receiver's firmware via RS-232.
• Supports DiSEqC 1.0/1.1/1.2/1.3 (USALS), Auto DiSEqC.
• Blind Search.
• Parental Control.
• Sorting, Moving and editing channels simultaneously on several parameters.
The front panel of the receiver TIGER 4050HD has a standard set of 3 control buttons - POWER, CH +, CH- .
Under the transparent plastic placed:
- An indicator of the presence of a signal in the form of LEDs;
- A four-digit display to display the channel number and the current time in standby mode;
- The power indicator LED as .
Rear panel contains a typical set of ports and slots:
- LNB IN, for connecting the cable from the satellite dish;
- SPDIF, coaxial digital audio output to connect to an audio system;
- VIDEO, AUDIO L, AUDIO R, analog composite video outputs and audio for connection to analogue television sets;
- HDMI, the interface with digital audio and video, to connect to your TV, ensures maximum image and sound quality; (Included)
- USB 2.0, to connect a USB flash drive. Can be used to connect WiFI adapter Ralink 5370 chipset USB WiFi, firmware updates and settings receiver, playback of media files (jpg, bmp, gif, mp3, ogg, flac, wav, mpg, avi, 3gp, mkv, mp4, mov, ts, m2ts, dat, vob), video recording.
- RS-232 service port with serial data transmission, can be used for firmware upgrades and other purposes;
- Switch ON/OFF, the power to issue 90-240 50/60 Hz receiver.
Software
Update receiver TIGER 4050 HD with USB-menu
1. Log in to the USB-menu and find the file with the software (data key)
2. Press OK and confirm software update
3. After the upgrade, reboot the receiver.
Warning !!! Do not disconnect the power or remove the USB flash drive during the upgrade process. This may cause damage to the device.
Activate the menu patch (emulator)
To open channels BISS coding, you must activate the menu patch (emulator). Standing on any channel you need to press F1 + 000
Then you can add the necessary keys with the remote. The editor is in the MENU -> Settings -> menu Patch .
For quick editing BISS keys can use the simplified method, when being on a coded channel in BISS, press the PAGE-DOWN button on the remote. To change/add BISS keys, press the GREEN button.
Update the channel list and the keys
To update the list of channels and keys, you need to insert the flash drive into the USB port of the receiver, enter the menu Advanced -> USB, select the file or key channel list, press the OK button on the remote control, and agree with this operation .
1. Enter the USB menu of the receiver (USB button on the remote control)
2. Press the YELLOW button on the remote control to save the channel list or keys and select "Upload channel list" or "Unload the keys." Channel list will be saved to a file with the extension "* .sdx", and key in a file with the extension "* .key"
3. To update the channel list and press OK key on the desired file in the USB-menu.
4. At the end of the upgrade process, you may need to restart the receiver, which will be requested in the pop-up window.
The letters in the column on the left to save after the letters to select OK.
Function Keys
F1 + 000: Emulator on/off
F1 + 111: Selecting UART
F1 + 222: Ident list with the possibility of manual binding
F1 + 333: Manual input BISS keys
F1 + 444: Manual entry key
F1 + 147: Editing keys
F1 + 555: IP Settings
F1 + 666: Plants server
F1 + 777: Auto IP
F1 + 999: Motor Settings
