
Search
Installation of satellite TV
Advertising
Navigation
Main
Satellites
TV Package
HD Channels
Ultra HD Channels
BISS key
Coverage Maps
Sat Receivers
Installation of satellite TV
Satellite News
Contacts
Search
Installation of satellite TV
Advertising
Navigation
Installing and setting up a satellite dish with your own hands |
Content
General information on satellite televisionBefore installing the satellite dish, you need to familiarize yourself with general information, which will eventually help with setting up the equipment. First, let's find out what a geostationary orbit is. This is the orbit, which is at an altitude of about 35,000 kilometers from the earth, and equals the equator. Broadcast satellites are located in the geostationary orbit. It is at this altitude, the speed of the Earth is equal to the speed of the satellite, so the satellite hangs over the same point of its surface. The location of the satellite in the geostationary orbit is called the point of standing.From Earth, the stationary orbit is "visible" on the sky in the form of the so-called "Clark Belt". Clark's belt is "visible" as an arc of a curve that degenerates from a circle at the poles to a straight line at the equator. In the horizon, Clark's belt "rests" precisely in the east and west, regardless of location. In the technical guide to satellite equipment, satellite standing points are indicated by their geographical longitude: the angular distance from the zero (Greenwich) meridian. This should be taken into account when orienting the antenna and giving an amendment: from this point the Greenwich meridian is "visible" at an angle opposite to the longitude of the place. As you see some stationary satellites from Greenwich, shown in the picture.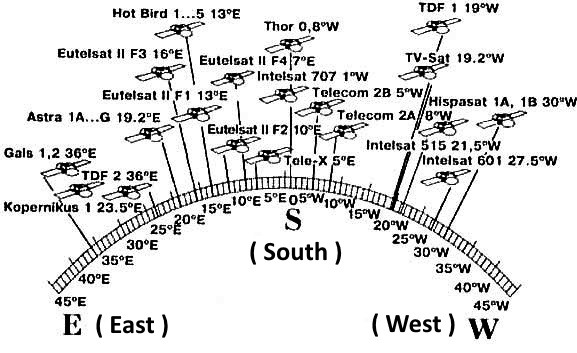
Determination of azimuth and elevation angleTo accurately install a satellite dish, you need to know: the latitude and longitude of your location, the satellite you plan to tune in, by these parameters and the angle of the place is determined (how much the antenna is tilted.) Turn the antenna up and down and the azimuth (turn the antenna to the right to the left). Antenna tuning is performed by turning to the right - to the left and upwards - downwards and the signal on the satellite receiver is looked at a certain frequency.The azimuth is the angle offset from the northward direction in a clockwise direction. The elevation angle is the angle in the vertical plane between the horizontal and the direction to the satellite. First you need to determine your coordinates. Let's say you are in the coverage area of the IntelSat 904 satellite, at a point with coordinates 55 degrees 53 minutes north latitude (55 ° 53 'N) and 37 degrees 26 minutes east longitude (37 ° 26' E). Note that the coordinates can be specified in the form of "degrees - minutes", and "degrees - decimal degrees of degrees". In the second case, the same coordinates will be represented as 55.88 degrees north latitude. and 37.43 degrees east. Calculate the direction of the satellite by using Online calculator on our website or using the program "Satellite Antenna Alignment". 
Using any of the means mentioned above, determine the azimuth and elevation angle for the Intelsat 904 satellite (the point of standing is 60 degrees east longitude). As a result, we got the azimuth on the satellite at 153.3 degrees and the elevation angle of 23.2 degrees (the differences in the second decimal point are related to the accuracy of the representation of coordinates and calculations and do not affect the antenna's tuning). 
In the direction to which the antenna should be directed near there should be no tall buildings, trees, high-voltage lines. Antenna selectionThe choice of a satellite dish basically comes down to buying an antenna with the required diameter. As a rule, it depends on the diameter of the "dish" that the quality of satellite broadcasting depends, so if in the central parts of the satellite coverage there can be enough and 60 cm of the dish, then for regions located on the edges of the satellite coverage, a larger diameter is required, which can be equal to 1.5 m.Mounting of satellite dish by elevation angle 1. Assemble the satellite dish according to the operating instructions.
2. Attach the satellite dish bracket. The fastening elements of the plate (anchor bolts, studs, nuts, screws, etc.) are selected depending on the wind load and wall material to which the satellite dish is attached. 3. Install the satellite antenna converters in the holder with the connector downward, so that the atmospheric moisture does not get inside the converters of the satellite dish. 4. Connect the cable to the converters of the satellite dish using the F-connector *. 5. Attach the cables to the arc of the tray holder with a plastic tie or an insulating tape. 6. Seal the F-plug connection along the entire length with 2 layers of insulation tape and evenly coat the insulation tape with a layer of silicone sealant. 7. Install the satellite dish on the bracket. Tighten the adjusting nuts so that it is possible to move the antenna in a vertical and horizontal plane with some effort. 8. Attach the cable to the satellite antenna bracket with plastic ties or tape. At the antenna, leave a 1 m cable stock, also securing it to the bracket. Converters, multifids, DiSEqCThe signal received by the "Mirror" of the satellite antenna is focused on the converter ("head"). In the converter, the signal is lowered by the frequency by the converter's local oscillator frequency (indicated on the converter itself) and transmitted via cable to the satellite receiver (tuner). And already the satellite receiver receives the signal, which goes through the satellite, it processes, decodes and sends to the TV the finished "picture". To configure our antenna, we need 3 Ku-band linear-polarization converters, since the satellites to which we will adjust our antenna will broadcast in the Ku-band of linear polarization. The stickers of these converters bear the main reception parameters: Reception frequency 10.70-11.70 GHz, 11.70-12.75 GHz; Intermediate frequency 950-1950 MHz and 1100-2 2150 MHz; The local oscillator frequency is 9750 MHz and 10600 MHz; Noise level: 0.3 dB. The use of two heterodynes is due to the fact that the Ku-band is wide enough (2,050 MHz), according to this Ku-band is divided into two sub-bands of 10700-11700 and 11700-12750 MHz. 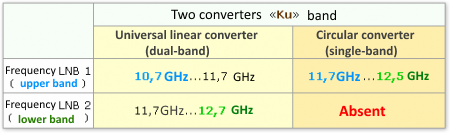
Given the high density of satellites in orbit, one satellite dish can simultaneously receive signals from two, three, four or even five satellites that are in close proximity to each other. Accordingly, two, three, four and five converters must be used for this. Additional converters are attached to the carrier rod of the satellite antenna (arc) by special holders - multifids. 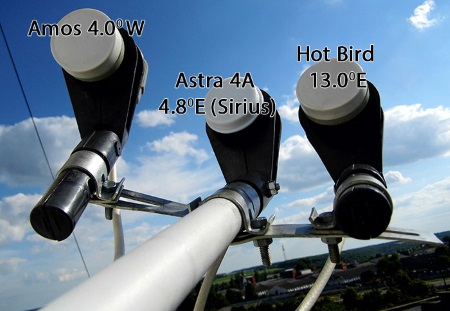
Such a combination of satellites on one dish Amos 4.0 W, Astra 4A 4.8E, Hot Bird 13.0E it is customary to call a bundle 4W + 5E + 13E. An example of a popular combination of 4 satellites on one plate Amos 4.0 W, Astra 4A 4.8E, Eutelsat 9B 9E, Hot Bird 13.0E bunch 4W + 5E + 9E + 13E 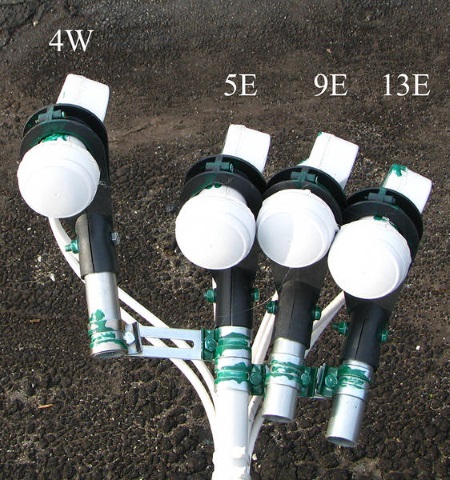
We will not consider all possible combinations, this is beyond the scope of this article. It should be said that there are a lot of them and for the viewers of different countries such combinations of their own. In this article, we'll look at how to set up a satellite dish for the popular 4W + 5E + 13E combination, for you the combination may be different, but the tuning principle remains unchanged. Considering that the satellite receiver can supply power to only one converter, in such cases DiSEqC-switch is installed, which automatically switches the power from one converter to another, depending on what you are watching the satellite. 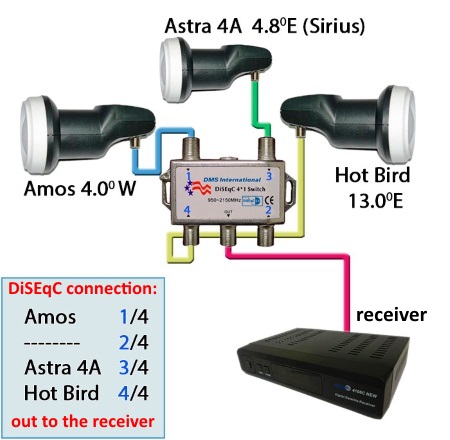
Since the satellite dish is a mirror for the satellite signal, the signal reflected from its surface and is collected in a bunch enters the converter. When installing additional heads at the side multifeed reflected satellite signal from the right with respect to the central catch follows the left hand side, and the reflected signal from the satellite of the left to the right. Ie we have a central satellite Astra 4A 4.8E is its we catch at the center of the antenna, satellite Amos 4.0 W is 4.8 degrees to the right, so the signal from him to be sought from the left side. The Hot Bird 13.0E satellite is located to the left of the Astra 4A, so we will search for the signal from 13 degrees on the right side. 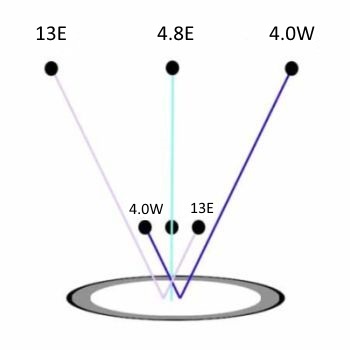 Setting up the satellite dish:1. The first thing is to set the dish on the central satellite, in our case it's Astra 4A 4.8E. Using an engineering compass adjusted for magnetic declination, we expose the antenna to the desired azimuth. Roughly, by eye, we expose the antenna beam on the angle of the place. To configure the antenna, we need to remove the TV with the tuner and put it closer to the installation site so that we can see the percentages on the tuning scale. The power switch (dissek) is not connected yet, so as not to be confused with satellites. Initial adjustment is done on the average converter, it is also central. 2.Second: We connect the TV and the converter to the receiver, turn on the equipment, select in the receiver menu ("Antenna installation" -> "Manual search"). We drive in the necessary signal parameters (the prepared frequencies of the transponders), according to the instructions to it. 3. Turn on the signal search mode. Gently and gently rock the antenna up and down until the receiver "grabs" the satellite. If "not caught", we check once again the azimuth and, changing it in steps of 3 degrees to the right and to the left, we repeat the procedure of "rocking". When the signal is caught, very carefully, slightly turning and rocking the antenna, we achieve the best quality and signal level. Priority is for quality. 
At 60% level and 80% quality, the reception stability will be twice as high as the opposite. Caution, in a few tricks tighten the nuts fixing the antenna and the angle of inclination. At the same time, you need to monitor the signal all the time. From the main menu of the receiver, we check whether the satellite is caught. If all the parameters were set manually, failures, as a rule, do not happen. But if there is no signal or image - we loosen the plate, and - we start again.  4. Once the desired satellite is caught and fixed the position of the antenna at the maximum signal- Turn on the "Level-quality" again, and gently moving back and forth and slightly turning the converter in the socket, while achieving maximum readings on the QUALITY scale. 
Attention! Adjustment of the antenna must be done by standing behind the mirror dish holding the bracket bracket with the hand. You can not turn a mirror because it can deform, and from any interference that appears in front of the antenna or in front of the converter head, the signal decreases or disappears altogether. Once again, we are convinced that the antenna is tuned to the satellite to which we tuned it, and not to some other one. To do this, scan the transponders from table 1 and enable some kind of channel.
Table. №1. Parameters for setting up the Satellite Antenna:
5. Setting up additional 2 satellites (Amos 4.0 W and Hot Bird 13.0E) is to find the position of the converter relative to the central one. We connect to the receiver the following converter, for example, the Amos 4.0 W satellite. In the menu, we set its parameters. DO NOT TROUBLE ANTENNA, gently and gently turn the converter to the right or left until it "grabs" the satellite. We are convinced that we "caught" what is needed, as described above. Moving the converter back and forth (this is so-called focus) and rotating (adjusting along the polarization plane), we achieve the best signal. Similarly, we adjust the third converter for the Hot Bird 13.0E satellite. 6. After all the manipulations, it is necessary to once again make sure all satellites are correctly tuned, once again check the tightening of all antenna elements. 7. Now you can connect DiSEqC (Disek) using prepared and designated cable lengths with the appropriate convector. Unforgettable in the receiver set the port numbers for each satellite. Then we transfer the equipment to the house in place. Everything, on this installation of the satellite aerial is finished. It remains in the receiver's menu to select and configure the desired programs (channels). Select a satellite tuner (receiver).To date, satellite receivers, depending on the technical characteristics, can be divided into four main classes: Class 4: This is usually a budget satellite receiver, designed to receive non-coded TV channels. Most often they do not have a card reader. The TV connects to them using RCA (tulips), SCART or HDMI cables. They reproduce such receivers of the TV program in the DVB-S / S2 digital standard, the MPEG-2 / MPEG-4 video compression format. The cost of receivers varies between 18-25 $. An example of a budget receiver can be Sat-Integral 1225 HD Able, Tiger X80 HD, Tiger 4100 HD Class 3: The third class includes receivers, which, in addition to the previous receivers, have a card reader that allows you to install maps of paid satellite operators. Before selecting a receiver with a card reader, you should find out which encoding is broadcast by the operator whose services you want to use. This can be the encodings of Conax, Irdeto, Viacces, etc. As a rule, each receiver supports one kind of encoding, in rare cases - several types. Reproduce these receivers TV channels in the DVB-S2 standard and cost $ 30-60. Class 2: The second-class receivers include the most popular HDTV receivers at the moment (DVB-S2 standard, MPEG-4 video compression format). For example, receivers Openbox S4 Pro + HD, Amiko SHD-8900 Alien, GI S8120 or Sat-Integral S-1210HD. Class 1: The first-class receivers include HDTV-receivers with advanced capabilities and the cost of $ 200, which, in addition to receiving satellite signals in high definition, can serve as a home media center. For example, they have the ability to install, or already have on board additional digital tuners that allow you to connect DVB-C cable TV present in your home, or a DVB-T digital terrestrial television that can be received on a regular terrestrial antenna, for example like the Optibox Raptor HD. Conclusion In this article, we have considered only the basic steps of setting up a satellite dish (dish) using the example of a popular combination of three Amos 4.0 W, Astra 4A 4.8E, Hot Bird 13.0E satellites. Installation and tuning of antennas to other satellites is done in a similar way and consists of such stages as: - selection of satellites, selection of their frequencies; - determination of terrain coordinates, determination of azimuth; - installation of the antenna; - adjustment as described above. | |||||||||||||||||||||||||||||||||||||||
